Create a beautiful custom bed caddy using your Brother sewing machine and a few Brother accessories. Quilt your own fabrics for a lightly padded finish that will match your décor and unique style. This handy craft will help organize bedside items you reach for on a regular basis. Pick some pretty fabrics, gather up your tools, and prepare to tackle this easy sewing project. You’ll learn more about the use of several optional accessory feet featured in these instructions. Are you ready? Let’s go sew!
Materials and Supplies:
- Brother sewing machine with basic built-in stitches.
- SA190 Roller Foot for attaching gripper material to bed caddy.
- Additional accessory feet for this project, optional but very helpful:
- SA184 Edge Joining Foot
- SA160 Stitch Guide Foot
- SA132 Quilting Guide
- Basic notions, including thread to match or blend with fabrics and a removable marker. I recommend a rotary cutter, mat, and ruler for cutting fabric pieces.
- Materials for bed caddy, including fabric, thin fusible craft fleece, and gripper material:
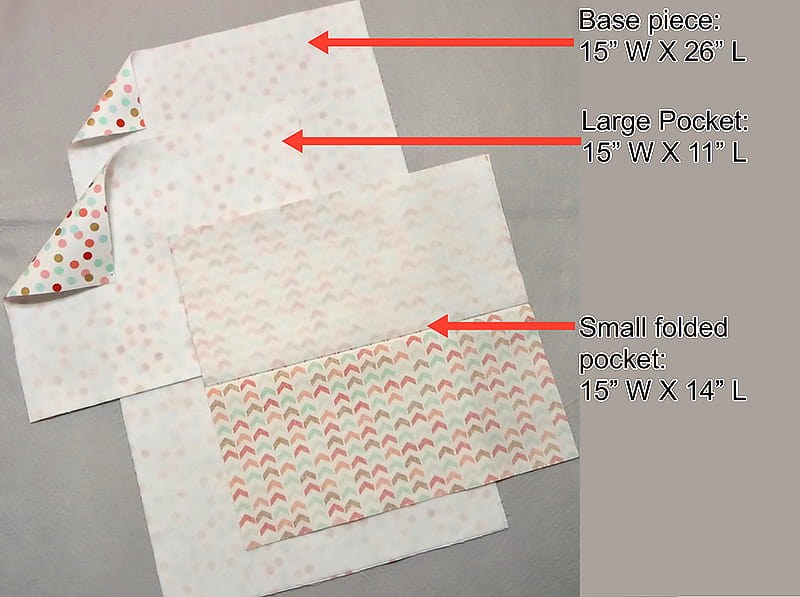
- Cut one piece of quilt weight cotton measuring 15-inches wide X 26-inches long for base of bed caddy. Fuse thin craft fleece to wrong side.
- Cut one piece of quilt weight cotton measuring 15-inches wide X 11-inches long for large pocket. Fuse thin craft fleece to wrong side.
- Cut one piece of quilt weight cotton measuring 15-inches wide X 14-inches long for small folded pocket. Note: Fold pocket piece in half lengthwise and press to form a fold line. Next, fuse thin craft fleece measuring 15-inches wide X 7-inches long to wrong side, matching fleece with fold line and raw edges on half the piece.
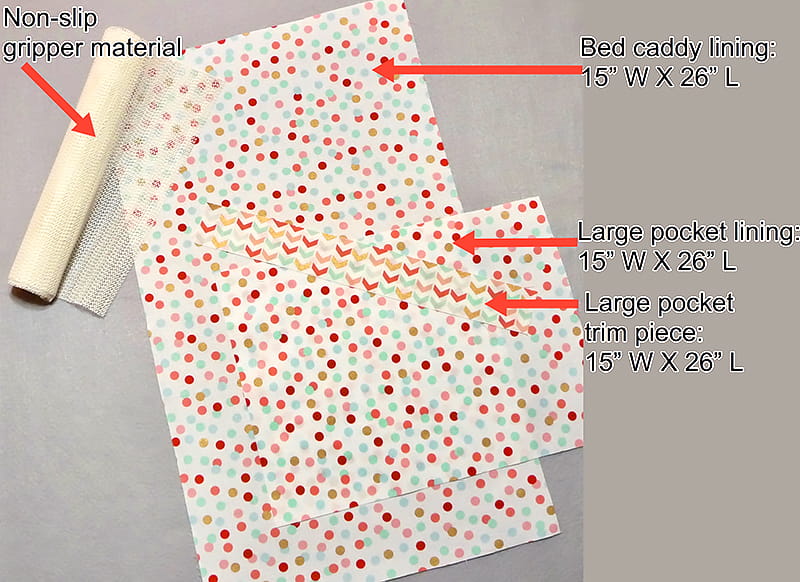
- Cut one piece of quilt weight cotton measuring 15-inches wide X 26-inches long for bed caddy lining.
- Cut one piece of quilt weight cotton measuring 15-inches wide X 11-inches long for large pocket lining.
- Cut one piece of quilt weight cotton measuring 15-inches wide X 2-inches long for large pocket trim.
- Cut one piece of non-slip “gripper” material measuring 13-inches wide X 9-inches long for top edge.
See all pieces in Figure #1a and Figure #1b.
Fabric tips: Choose two or more coordinating fabrics, mixing and matching as desired. You can eliminate the large pocket trim piece if you choose a third coordinating fabric. I used remnants left over from another project for this bed caddy. Since I only had two fabric prints to work with, I added the trim strip for extra contrast on the pocket.
Tips for using accessory feet listed with supplies:
- SA190 Roller Foot – The non-stick and roller capabilities on this foot are ideal for stitching “sticky” materials such as the gripper material on the top edge of the bed caddy. In this project you’ll see that I also used the roller foot to quilt single layers of fabric with thin fleece. Note that there are other feet better suited for quilting thicker layers.
- SA160 Stitch Guide Foot – Marked lines on this foot allow for consistent stitching of seamlines in a wide range of widths.
- SA132 Quilting Guide – The quilting guide fits snugly into the small hole found in the back of the presser foot holder so it can be used with any foot you choose. Simply slide the guide a measured distance from the needle and line up the guide with a previous line of stitching for consistent and evenly spaced lines of stitching.
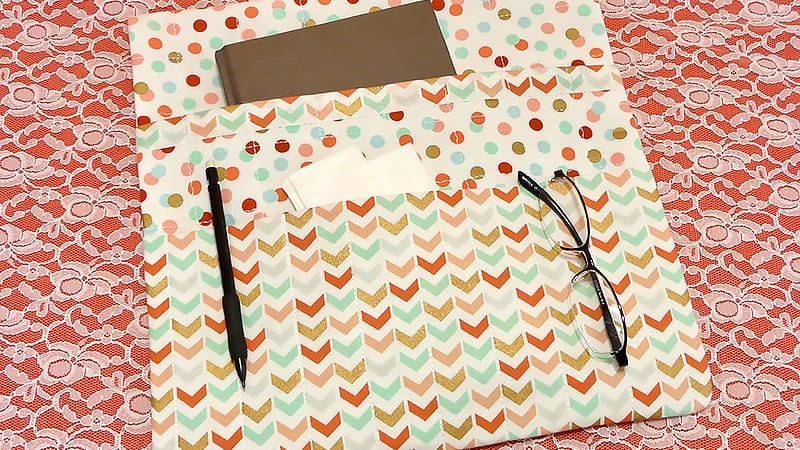
Finished bed caddy measures approximately 14-inches wide X 25-inches long. Please read through all instructions before beginning this project.
Basic steps for creating bed caddy:
- Add fusible fleece to caddy pieces.
- Add trim, then quilt caddy base and pocket pieces.
- Layer pieces and add lining.
- Attach gripper material to top edge to finish. Note: This piece helps keep the caddy from moving when placed between the mattress and box springs.
1. Prepare large pocket if you are adding the contrast trim. Add contrast strip as follows:
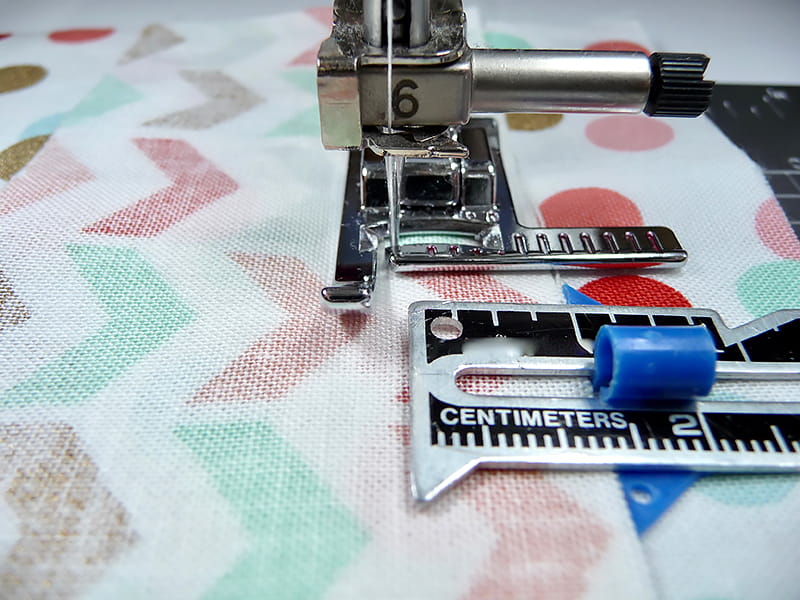
- Attach stitch guide foot. Layer 15-inch wide X 2-inch long strip along top edge of large pocket, with right sides together, placing it a scant 1-inch from top raw edge. See Figure #2a.
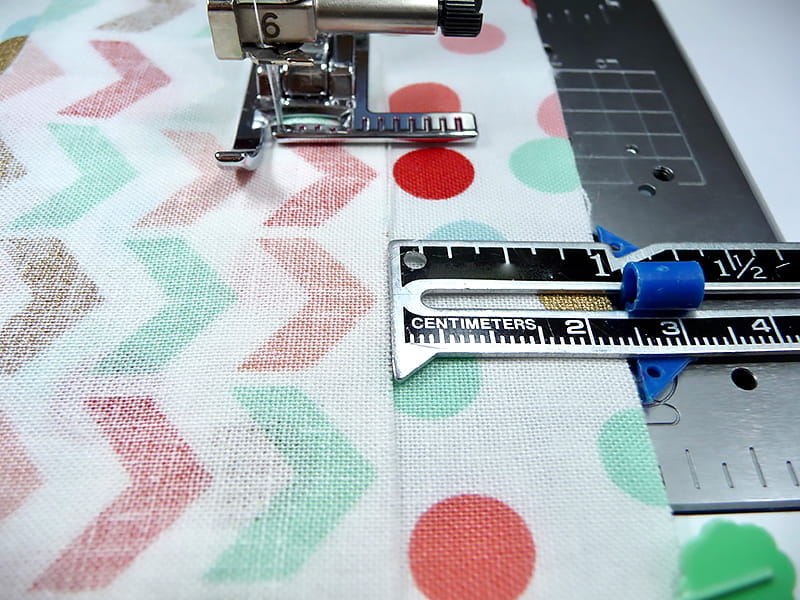
- Sew strip to top edge using a 1/2-inch seam allowance, following a specific line on the foot. See line spaced ½-inch from needle position in Figure #2b.
- Flip strip so right side faces up and press toward top edge.
2. Prepare to quilt pieces backed with fleece as follows:
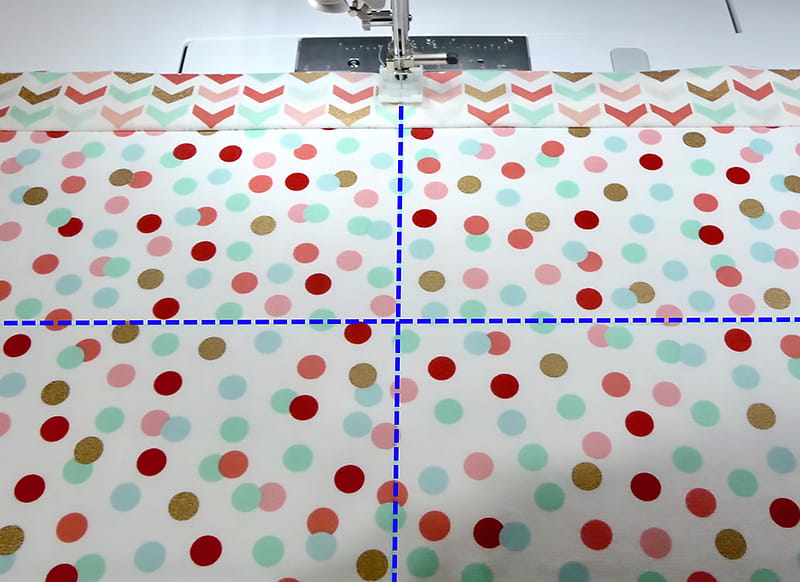
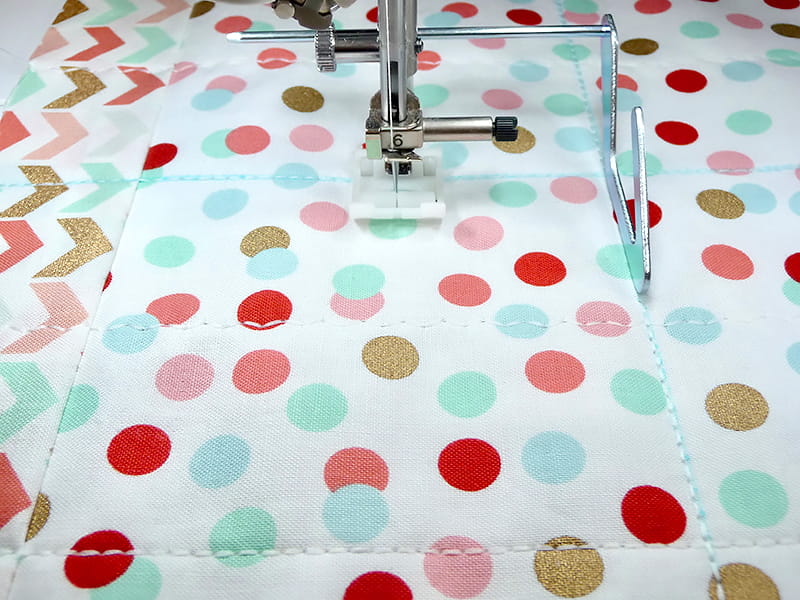
Mark starting lines along lengthwise and cross wise center on 15-inches wide X 26-inches long base piece and 15-inches wide X 11-inches long large pocket piece. Mark a lengthwise line on the center of folded pocket piece. Note: This smaller piece doesn’t require quilting in both directions. I used the fabric print to space lines on my small pocket. See example of marked lines on the large pocket piece in the enhanced photo in Figure #3.
Attach the roller foot if you have it and quilt all pieces, stitching evenly spaced lengthwise and crosswise lines.
Tips for Quilting Stitches: Stitch the first center line and then use the quilt guide set for evenly spaced remaining lines to the left and right of the first center line. I like to stitch all my vertical lines first and then turn the fabric to stitch horizontal lines. Fusible fleece does not require closely spaced lines. I spaced mine 1 ½-inches apart. Straight stitches are traditionally used for this type of quilting. However, I chose the triple stretch straight stitch along with alternating lines of the rick-rack stitch. Stitch settings listed below:
Triple Stretch stitch: Center needle position, stitch length, 3.5mm.
Rick-Rack stitch: Width 1.5mm, length 4.0mm.
See examples of quilting in Figure #4a, Figure #4b, and Figure #4c.
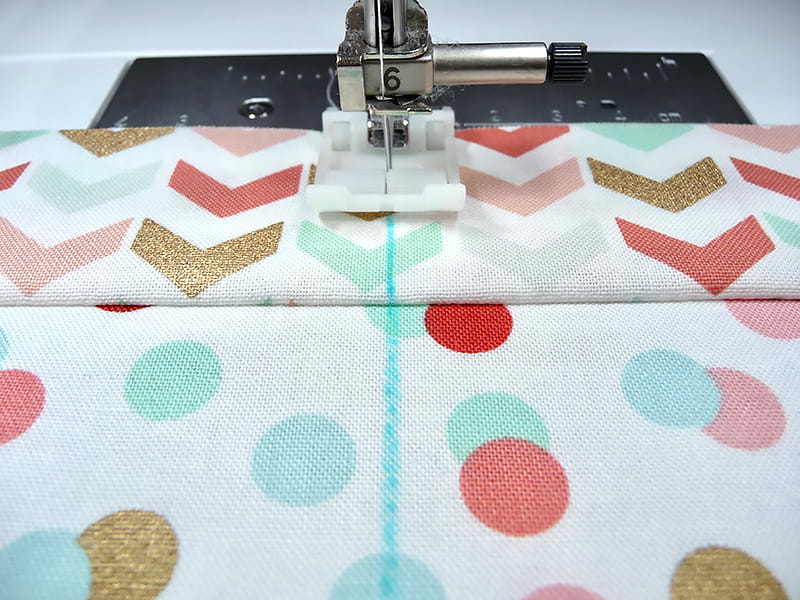
3. Layer large pocket with matching lining piece. See Figure #5.
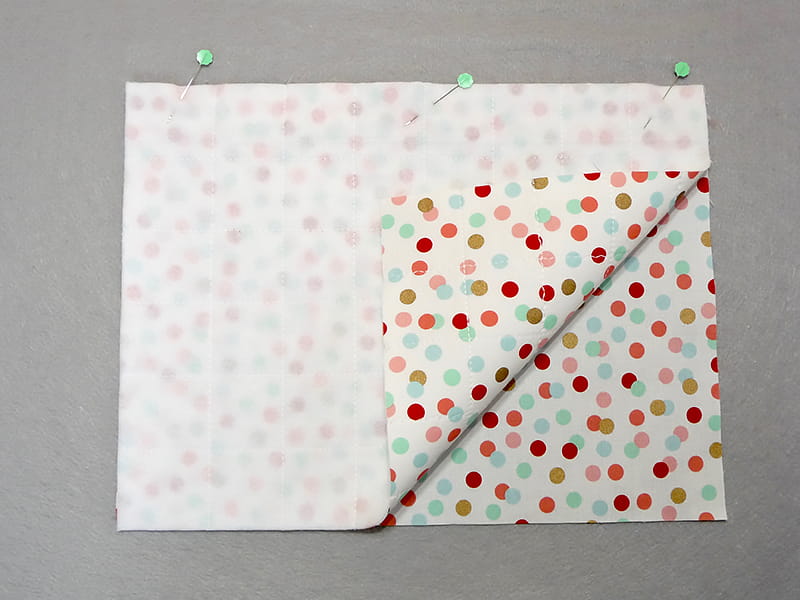
Sew top edge using a ½-inch seam allowance. Press lining to back side.
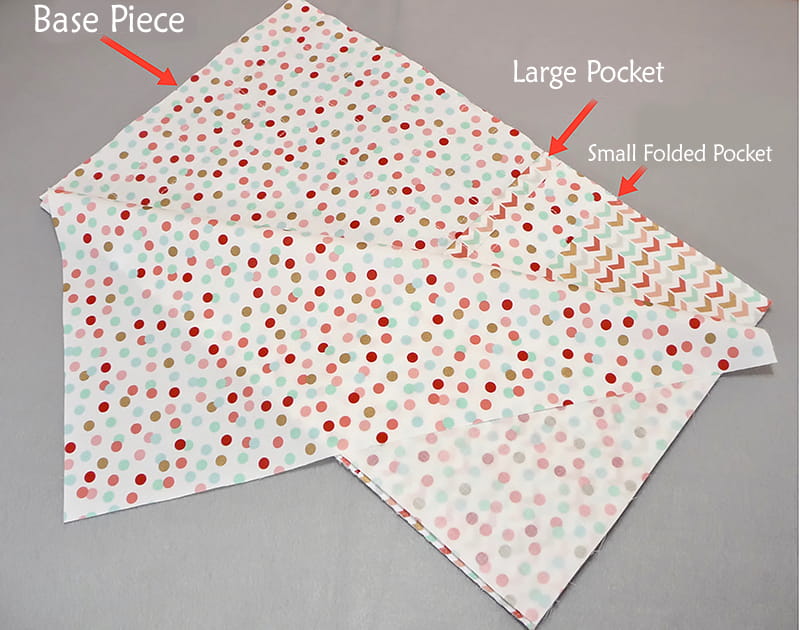
4. Layer bed caddy pieces as follows:
- Bed caddy base piece, right side facing up.
- Large pocket, right side facing up.
- Folded pocket, right side facing up.
- Bed caddy lining, wrong side facing up.
See layered pieces in Figure #6.
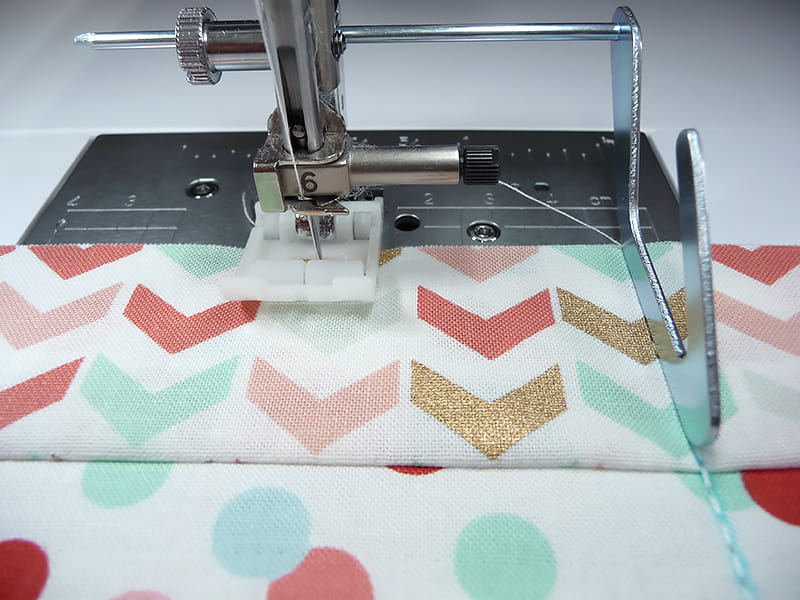
Sew layers together using a ½- seam allowance, leaving a 5-inch opening along the top edge for turning right side out. Tip: Use a small round object to mark off a slightly rounded stitching line for bottom corners. This gives a more attractive finish to the caddy and makes it easier to trim excess bulk.
Trim corners and lower rounded edges to reduce bulk. Turn caddy right side out, with lining on back side and quilted pieces positioned on the front side. Press carefully and close top by stitching close to edge.
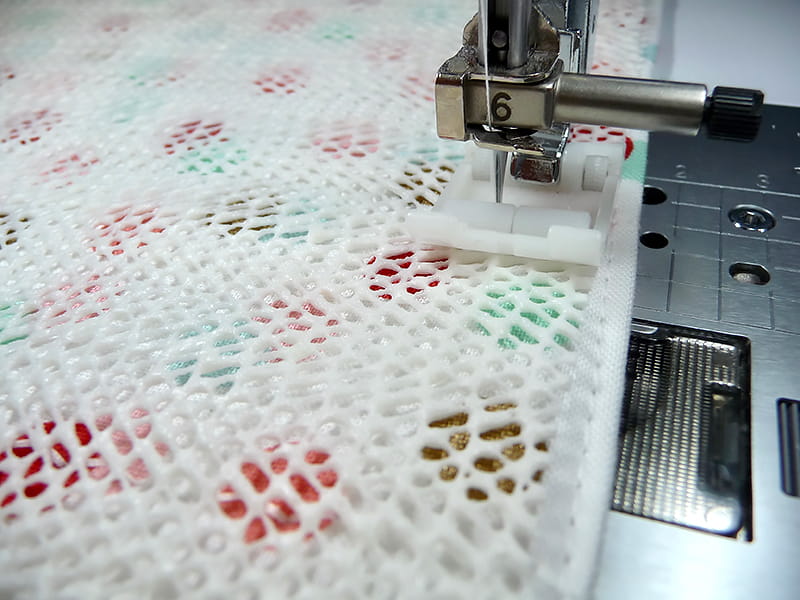
5. Center gripper material along edge opposite pockets. See Figure #7.
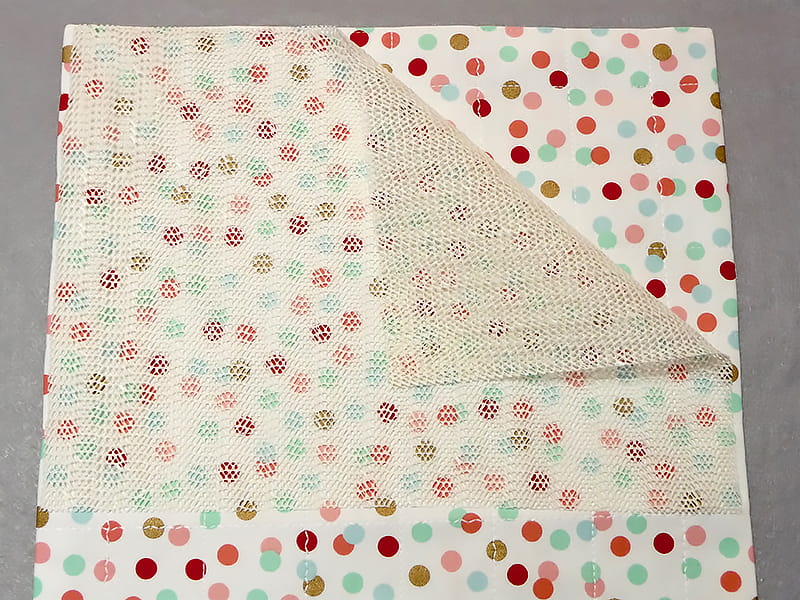
Sew to bed caddy using the non-stick roller foot. Tip: Make sure the entire foot is riding on the gripper fabric as you stitch. Sew slowly to keep material from shifting. See Figure #8.
You are finished! See completed bed caddy in Figure #9.

This article has been republished from Brother Sews USA.
The original article can be seen here: http://blog.brothersews.com/home-decor/quilted-bed-caddy/